A Baptism/Birthday Party Tutorial
We hosted a two-fer party in February for our grandson Daniel. Well, maybe a three-fer.
(a) On Saturday, February 14th--Valentine's Day--our little sweetheart would be
(b) baptized and
(c) celebrate Birthday #3.
Since I really enjoy decorating our home for a party, I scoured Pinterest for ideas. Nix on baby blue baptism with doves. Nix on a shower of Valentine hearts. Nix on Thomas the Train or Wheels-themed birthday. I was stumped; how do I blend all these celebrations into one? Shopping excursions to Target and (where else?) Hobby Lobby scored me some inspiration items. Those, along with illustrations from a children's book from GiGi's stash, were my jumping off place.
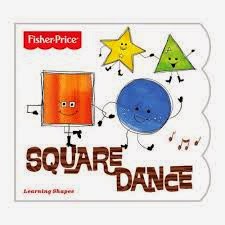 |
| I used this book (in GiGi's stash) as inspiration for our happy celebration. Okay--I broke copyright laws all over the place. |
Invitations
 |
| With help of Microsoft Office Publisher, I designed and printed the invitation in-house on cardstock; trimmed with rotary cutter, acrylic ruler and mat. |
 |
| Want a shape? Click. Click. Done. Well, . . . almost. |
 |
| Happy Dancers |
 |
| Somebody needed a moustache. |
 |
| Do you think I'll face charges for copyright infringement? |
 |
| After printing design on white cardstock, I sketched random lines around each shape with a fine point Sharpie pen to give some movement-- just like the book's illustrations. |
 |
| My nod to February 14th. Not code for a love triangle ;~J |
 |
| I found a celebratory font called WIZARDRY. |
 |
| Because I skipped the tutorial on printing double-sided stuff, Plan B was a go. Glued down a cut-out star and . . . |
 |
| . . . printed info on vellum paper. It looks really fancy, but is so easy. |
 |
| I attached vellum insert with transparent glue dots. Sheer vellum allowed star shape to peek through. (White lines are photoshop blurs of info--not the glue!) |
While I may not recommend this process for a party of 35, a baker's dozen was pretty easy for this retired housewife to knock out in a day. I found some perfect black chalkboard paper envelopes at Nirvana Hobby Lobby, addressed them with a permanent white 'chalk' pen, and dropped them at the Post Office.
 |
| Even though all pertinent info is blocked, you can see how the "chalk" pen looks on black envelopes. |
My only expenses for invitations were glue dots, envelopes, and extra postage (because the awesome chalkboard paper envelopes with the cute little string tie on the flap were 'oversized').
BTW--though mailed 2 weeks prior to the event, only a handful of invites were received beforehand. I mailed myself an invitation so I could see (1) how long it took to arrive, and (2) what it looked like when it showed up in the mailbox. During this particular season, there was 'neither rain, nor snow, nor sleet, nor hail' to slow mail service. Not even extra postage guaranteed timely delivery, because ours arrived on February 24th. Thank goodness for email and texts; everyone came to the party on the 14th.
Decorations
With red, white/chalk, black, and silver as my color story, and dancing shapes for fun, I got busy with some crafty stuff.  |
| Which black and white paper design will get modge-podged to which cardboard box? |
 |
| Googly eyes + pipe cleaner limbs made small cardboard boxes come alive. |
 |
| I attached scrapbook paper to box top with Mod Podge. Trimmed with sharp X-acto knife when dry. Covered curved edges with Washi tape. |
 |
| I removed lid and punched small holes to insert pipe cleaner arms and legs. Secured inside with a glob of glue. Replaced lid. |
 |
| Simple face details were cut from scrap cardstock, outlined with black Sharpie marker, and glued in place. |
Attached with fishing line to the chandelier, these little box people danced above the food table.
 |
| D checked out the dancing box people, but mostly his cake. |
Their one-dimensional triangle friends hung out on the mantel in a picture frame with black and whites of the guest of honor.
 |
| I printed copies of pix from Daniel's year off our computer on cardstock in black and white; then trimmed and attached to baker's twine 'clothesline' strung on picture frame. |
 |
| Little triangle men--happy to hang out. |

The other cardboard shape project was a big number 3.
 |
| Back and sides painted red, number 3 dried in preparation for chalkboard paper to be applied to its flat front surface. Then came chalked stripes. |
 |
| Happy Third Birthday! |
Chalk Lettered Banner
These blank chalkboard card banners came pre-strung on nice white grosgrain ribbon, and ready to label. According to Pinterest, unless you're an artist, it's best not to freehand chalkboard lettering.
Here's the drill:
- Find desired font. Size letters to fit banner flags.
- Print out the sized letters on regular paper.
- Work on flat, hard surface. Color the back of each letter heavily and completely with chalk.
- Lay letter face up/chalked side down on a flag and trace the letter with the point of a dull pencil. Press hard while tracing; chalk outline will transfer onto the black flag.
- Outline each letter with permanent 'chalk' pen.
- If desired, fill in letter with design/colored chalk.
- Clean any smudges with a slightly damp paper towel and a light swipe.
 |
| 'WIZARDRY' font had stars, so I placed those shiny star stickers randomly on each letter, then chalked the entire letter before removing the star stickers. I know, I know--way too much time on my hands. But I don't take meds for my OCD . . . |
Here's a list of project materials and their sources.
From Hobby Lobby: 3" shape cardboard boxes, cardboard 3, scrapbook paper, Washi tape, chalkboard envelopes
From Target: red/white baker's twine, blank chalkboard card banners with chalk
From JoAnn: small black plastic clothes pins
From my craft closet: Modge Podge, tacky glue, acrylic craft paint, foam brushes, permanent 'chalk' pen, black fine-point Sharpie marker, craft scissors, rotary cutter/mat/acrylic ruler, X-acto knife, pipe cleaners, googly eyes, vellum paper, colored cardstock, foil star stickers
Finally, I decided on the theme for this Valentine's Day Baptism/Birthday party for our 3 year-old grandson:
CELEBRATE BLESSINGS
 |
| This chalk banner hung over the party favor/gift table in the dining room. Silver ribbon curls floated over the gifts. |
 |
| A second chalk banner was on display from the mantel, just below pictures of our most recent blessing--a grandson. |
No comments:
Post a Comment